Oracle 11g Grid and Database Software Installation and Database creation.
In this article I'll describe the installation of Oracle 11g Release 2 Grid Infrastructure and Database software and Database creation on Oracle Linux (OL 6.4 64-bit).
The Installation is Divided into three parts
1. Oracle 11g Grid Infrastructure Installation
2. Oracle 11g Database software Installation
3. Database Creation using dbca
First we will Install the Oracle Grid Infrastructure. You can download the Oracle Software from here. For Linux Installation Instructions, please see my post to Install Oracle Linux 6.4 on Virtualbox.
Oracle 11g Grid Infrastructure Installation
1. Login as root user and install Oracle Clusterware Installation Prerequisites. Make sure you are able to connect to the internet. Run below command to install the prerequisites.
yum install oracle-rdbms-server-11gR2-preinstall
yum install oracleasm
yum install oracleasm-support
Cleanup YUM repositories:
yum clean all
Add user oracle to dba, oinstall and vboxsf groups.
Select System>Administration>Users and Groups


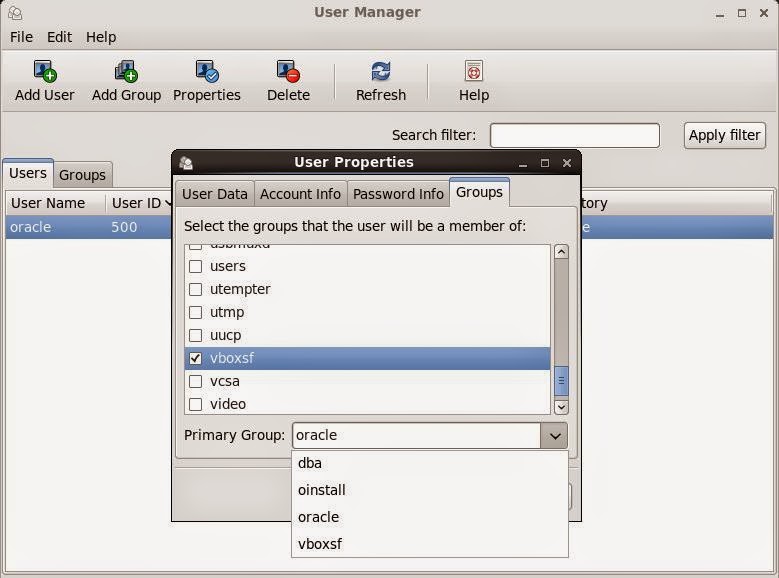

Select Users tab and Double click on user oracle
The User Properties window will popup. Click on Groups tab
Select the Groups dba, oracle, oinstall and vboxsf from the list.
Select the primary group as dba from the drop down menu in Primary Group. Click ok.
Close the window once done. Now you can see the primary group of oracle is changed to dba.
Create the directories in
which the Oracle software will be installed.
mkdir -p /u01/app/oracle/product/11.2.0.3/grid
mkdir -p
/u01/app/oracle/product/11.2.0.3/db_1
chown -R oracle:oinstall
/u01
chmod -R 775 /u01/
Create three Storage Disk with 7 GB Capacity each. Use below steps
ASM_DISK 01
ASM_DISK 02
Click on Storage
Click on Controller:SATA and click on Add Hard Disk
Click Create New Disk
Select VDI as the Hard Drive File Type. Click Next
Select Fixed Size. Click Next.
Type the name of the New Virtual Hard Drive as ASM_DISK 01 and Size 7 GB. Click on Create. Do the same step for the remaining two Disks.
ASM_
ASM_DISK 03
Shutdown the VMClick on Storage
Click on Controller:SATA and click on Add Hard Disk
Click Create New Disk
Select VDI as the Hard Drive File Type. Click Next
Select Fixed Size. Click Next.
Type the name of the New Virtual Hard Drive as ASM_
ASM_DISK 02
ASM_DISK 03
Startup the Virtual Machine and login as root user.
Configure oracleasm by using the command
Configure oracleasm by using the command
# oracleasm configure -i
Default user to own the
driver interface []: oracle
Default group to own the
driver interface []: dba
Start Oracle ASM library
driver on boot (y/n) [n]: y
Scan for Oracle ASM disks
on boot (y/n) [y]:
Writing Oracle ASM library
driver configuration: done

Determine the partitions available. The following command shows all the
partitions known to the OS.
cat /proc/partitions
or use
ls /dev/sd*

Use the
"fdisk" command to partition the new disks created.
For ex: if the new disks created are /dev/sdb, /dev/sdc and /dev/sdd, use the below commands
fdisk /dev/sdb
fdisk /dev/sdc
fdisk /dev/sdd
For ex: if the new disks created are /dev/sdb, /dev/sdc and /dev/sdd, use the below commands
fdisk /dev/sdb
fdisk /dev/sdc
fdisk /dev/sdd
The sequence of answers is
"n", "p", "1", "Return",
"Return" and "w" as shown below
fdisk /dev/sdb
Device contains neither a
valid DOS partition table, nor Sun, SGI or OSF disklabel
Building a new DOS
disklabel with disk identifier 0x62be91cf.
Changes will remain in
memory only, until you decide to write them.
After that, of course, the
previous content won't be recoverable.
Warning: invalid flag
0x0000 of partition table 4 will be corrected by w(rite)
WARNING: DOS-compatible
mode is deprecated. It's strongly recommended to
switch off the mode (command 'c') and
change display units to
sectors (command 'u').
Command (m for help): n
Command action
e
extended
p
primary partition (1-4)
p
Partition number (1-4): 1
First cylinder (1-652,
default 1):
Using default value 1
Last cylinder, +cylinders
or +size{K,M,G} (1-652, default 652):
Using default value 652
Command (m for help): w
The partition table has
been altered!
Calling ioctl() to re-read
partition table.
Syncing disks.
#


Use cat /proc/partitions or ls -lrt /dev/sd* to see if the new partitions are created

Initialize the asmlib
with the oracleasm init command. This command loads the oracleasm module and
mounts the oracleasm filesystem.
oracleasm init

Use the oracleasm
createdisk command to create the ASM disk
label for each disk.
oracleasm createdisk <diskname> <device_name>
oracleasm createdisk ASMDISK01
/dev/sdb1
oracleasm createdisk ASMDISK02
/dev/sdc1
oracleasm createdisk
ASMDISK03 /dev/sdd1

Run the
"scandisks" command to refresh the ASMLib disk configuration.
# oracleasm scandisks

Check the disk as below
# oracleasm listdisks

Check the the disks are
mounted in the oracleasm filesystem with the command
ls -l /dev/oracleasm/disks

Logout
root user and login as oracle user

update oracle user's .bash_profile
export ORACLE_BASE=/u01/app/oracle
export GRID_HOME=/u01/app/oracle/product/11.2.0.3/grid
export ORACLE_HOME=$ORACLE_BASE/product/11.2.0.3/db_1
export ORACLE_SID =orcl
export BASE_PATH =/usr/sbin:$PATH
export PATH =$ORACLE_HOME/bin:$BASE_PATH
export LD_LIBRARY_PATH =$ORACLE_HOME/lib:/lib:/usr/lib
export ORACLE_HOSTNAME=ol6.localdomain
export ORACLE_UNQNAME=orcl
export ORACLE_HOSTNAME=ol6.localdomain
export ORACLE_UNQNAME=orcl
export CLASSPATH=$ORACLE_HOME/JRE:$ORACLE_HOME/jlib:$ORACLE_HOME/rdbms/jlib
Shutdown VM and add
shared directory containing Oracle S/W

Click on the Folder icon on the right side of the Settings window and give the directory path and a directory name in the pop up window. This directory name is the name which will be displayed in /media as the new shared folder in Linux. Make sure the Auto-mount is checked and Read-only is unchecked.
Restart VM and login as
oracle user. Go to /media directory to find the shared folder you just now created. This is
where VirtualBox maps Host OS shared folder. Note that VirtualBox added prefix
"sf_" to the name of the folder. Type 'ls' to view the content of the folder:
$ cd /media
$ ls -lrt
$cd sf_Oracle_11g_sw
$ ls -lrt
$ ls -lrt
$cd sf_Oracle_11g_sw
$ ls -lrt
database grid

Make sure the network adapter Selected is System eth0

There is one package 'cvuqdisk' that should be installed before the Grid Infrastructure installation. Install it from grid/rpm directory as root user:
$ su root
Password:
cd /media/sf_Oracle_11g_sw/grid/rpm
rpm -Uvh cvuqdisk*
exit
Grid
Infrastructure Installation
1)
Start the Oracle Universal Installer (OUI) by running the script runInstaller in grid directory as oracle user.
$
$ ./runInstaller

$ ./runInstaller
2) Select Software Updates. Click Next


In the Perform Prerequisite Checks page, the OUI checks to make sure that your environment meets the minimum requirements for this installation.
In many cases if a prerequisite check fails, the OUI can generate a fixup script to fix the problem. For our Installation, all prerequisites have been met so no issues are found and the OUI automatically advances to the next page.

In the Summary page, review the settings and information, and click Install.

The Setup page appears showing the progress of the installation and the status of the individual tasks being performed.


Open a terminal window and log in as root.
Run the scripts shown in the Execute Configuration scripts window
The first script is /u01/app/oraInventory/orainstRoot.sh

The second script is /u01/app/oracle/product/11.2.0.3/grid/root.sh. Accept the default value /usr/local/bin for the local bin directory by pressing Enter when prompted.

Click OK in the Execute Configuration scripts window.

The OUI continues with the remaining installation tasks

Click Close on the Finish page to complete the installation of Oracle Grid Infrastructure for a standalone server

Next step is to configure the FRA disk group. In a terminal window, logged in as oracle, perform the following steps:
Use the oraenv utility to set the environment for the terminal session.
Enter +ASM when prompted for the ORACLE_SID
Start the ASM Configuration Assistant by entering asmca at the command line.

The ASM Configuration Assistant opens up displaying the current disk groups for the +ASM instance. Click on Create.

Enter FRA for the Disk Group Name. Select External (None) for redundancy. Select disk groups ASMDISK03 and click OK.

Disk Group Creation is in Progress.


Notice that now there are two disk groups (DATA and FRA) listed for the ASM instance. Click Exit. Click Yes when asked if you really want to quit this application.
Close any open terminal windows.

Oracle Database 11g Release 2 Installation on Oracle Linux 6

$ ./runInstaller


The Configure Security Updates page is the first to appear. In your real-world environment, you would enter your email address and My Oracle Support password. However, because the classroom is an isolated environment, please leave the email and password fields blank. Deselect the option to receive security updates from My Oracle Support and click Next.
Click Yes in the Email Address Not Specified warning message that appears.

Select Skip Software Updates. Next

Select the Install database software only option and click Next.

Select Single instance database installation and click Next.

Select all the languages and click Next.

Select the Enterprise Edition (4.7GB) and click Next.

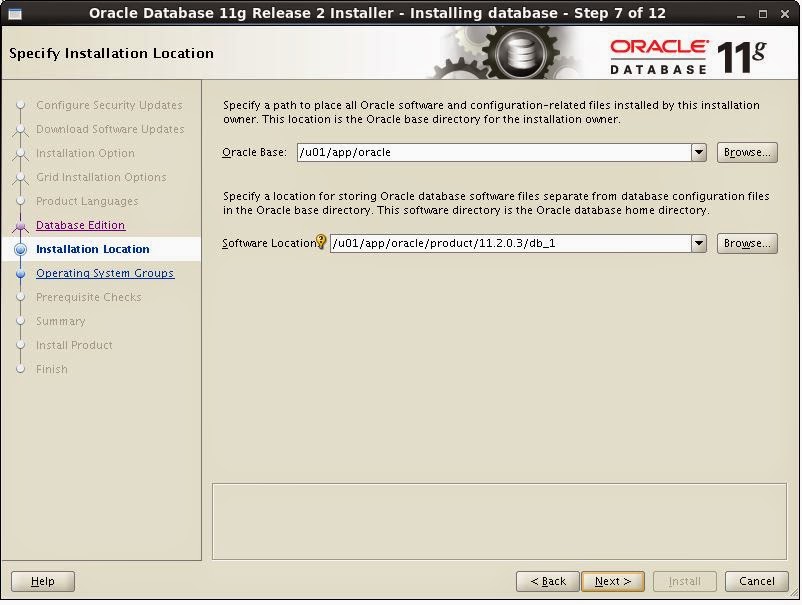
In the Specify Installation Location page ensure that the value for Oracle Base is /u01/app/oracle.
For Software Location, enter /u01/app/oracle/product/11.2.0.3/db_1. This is the location where the Oracle database software will be installed. Click Next.
Select dba for both the OSDBA and OSOPER groups on the Privileged Operating System Groups page and click Next.

In the Perform Prerequisite Checks page, the OUI checks to make sure that your environment meets the minimum requirements for this installation.
In many cases if a prerequisite check fails, the OUI can generate a fixup script to fix the problem. For our Installation, all prerequisites have been met so no issues are found and the OUI automatically advances to the next page.

In the Summary page, review the settings and information, and click Install.

The Install Product page appears, showing you the progress of the installation and the status for each individual task being performed.

When the Execute Configuration scripts window appears, follow the steps listed in the window.

Open a terminal window and log in as root. Run the script shown in the Execute Configuration scripts window. Accept the default for the local bin directory and do not overwrite any files (you can just press [Enter] because the default option is to not overwrite).
Click OK on the Execute Configuration scripts window.

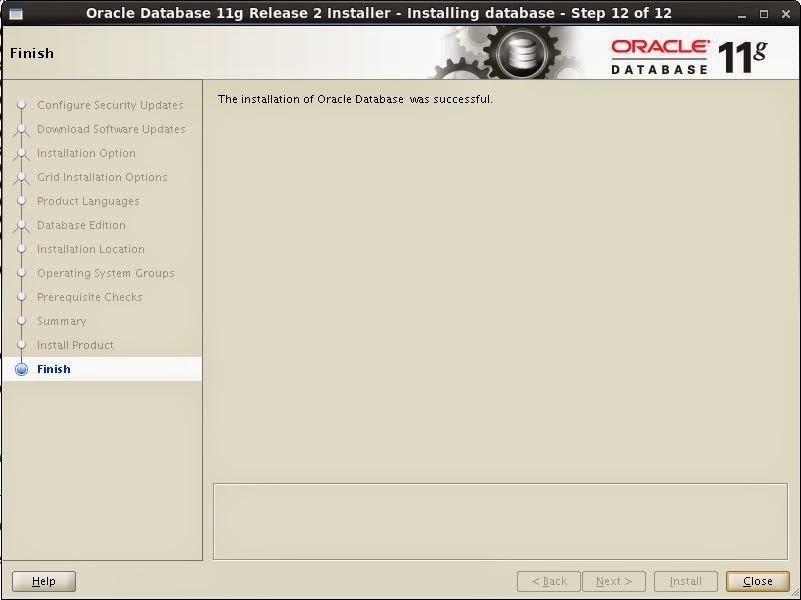
Click Close on the Finish page to complete the installation of the Oracle Database 11g software.
Oracle Database Creation
Open a new terminal Window and make sure the Listener and the ASM instance is up and running using the below commands.
lsnrctl status
ps –ef|grep pmon
Start the Database Configuration Assistant using the command dbca

DBCA Opens up.

Click Next

Click Create a Database. Next

Select General Purpose or Transaction Processing

Specify the Global Database Name and SID as orcl

Make sure Configure Enterprise Manager is checked.

Check Enable automatic Maintenance tasks. Click Next

Select Use the Same Administrative Password for All Accounts. Provide oracle_4U as the password.

Select Automatic Storage Management(ASM) as the Storage Type. Then click on Browse to select Database Area

Select DATA as the Disk Group for Database. Click OK.

Click Next.

Provide the ASMSNMP Password which we specified during the Grid Installation.
Here it is oracle_4U. Click OK

Specify the Fast Recovery Area. Click on Browse to choose the Disk Group for the Fast Recovery Area. Specify the FRA Size here


Make sure to check Sample Schemas if you want to create the Sample Schema in the database during the database creation. Click Next

Specify the Memory Size Here. You can enable AMM or ASMM here. Click on Sizing
 Specify the Max Processes in the Database. you can leave the value untouched as of now. Click on Character Sets

Specify the Character Sets Here.Choose the Default option. Click on Connection Mode.

Select the type of Connection. Choose the Dedicated Server Mode. Click Next

You can Change the Database Storage here like datafile, redo log file, controlfile name and location. Click Next.

Make sure Create Database is selected. Click on Finish

The Create Database Summary is shown. Confirm it and click OK.

This will start the database Creation.

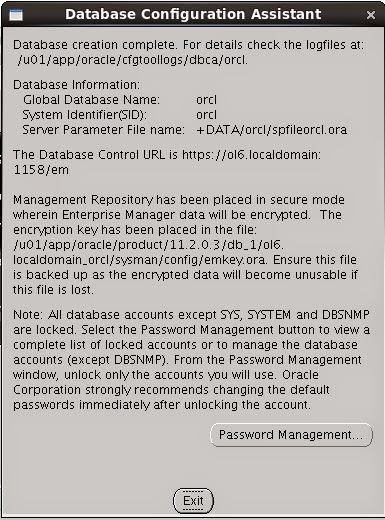
Once the Database creation Completed Successfully, the summary is displayed. Click on Exit
Login to the database using the command
sqlplus / as sysdba
Check the database name and open_mode using the SQL Command
Select name,open_mode from v$database;

Starting and Stopping ASM and Database.
Steps to start ASM, Database and EM.
1. Start ASM
srvctl start asm -o mount
2. Start Database
srvctl start database -d orcl

3. Start dbconsole
set the environment for database using the command oraenv and give the database name as orcl. then start the dbconsole using the below command.
emctl start dbconsole
Copy and Paste the URL for accessing the Enterprise Manager on to any browser.

Give the username as sys and password as oracle_4U. Connect as SYSDBA. Click on Login.

You will be logged in to the homepage of EM

Steps for Shutting Down the Database.
1. Set the environment for database and Shutdown the Database Control using the below command.
emctl stop dbconsole

2. Set the environment for ASM and Shutdown the Database and ASM instance using the below command.

3) Select Configure Oracle Grid Infrastructure for a standalone Server. Click Next
Select the Languages. Click Next
On the Create ASM Disk Group page, provide the Disk Group Name as DATA and Redundancy is set to Normal. Click on Change Discovery Path to provide the path of the ASM Disks we created earlier. Give the Discovery Path as /dev/oracleasm/disks and click OK
Now you can see the ASM Disks listed
Select the first two disk groups (ASMDISK01, ASMDISK02). Click Next.
On the Specify ASM Password page, select the option to use the same passwords for both SYS and ASMSNMP accounts. Enter oracle_4U as the password and click Next.
This is the Privileged Operating System Groups page. Here you have to give the Operating System Groups which are used for the database administration. Since this installation is for academic purpose, you can provide same operating system group (dba) for all.
Select dba for all three options and click Next to continue.
A warning appears because we have specified the same operating group for all administrator groups. This is expected, so click Yes to continue.
On the Installation Location page, ensure that the value for Oracle Base is /u01/app/oracle.
For Software Location, enter /u01/app/oracle/product/11.2.0.3/grid
Click Next.
On the Create Inventory page, accept all the defaults and click Next to continue.
In the Perform Prerequisite Checks page, the OUI checks to make sure that your environment meets the minimum requirements for this installation.
In many cases if a prerequisite check fails, the OUI can generate a fixup script to fix the problem. For our Installation, all prerequisites have been met so no issues are found and the OUI automatically advances to the next page.
In the Summary page, review the settings and information, and click Install.
The Setup page appears showing the progress of the installation and the status of the individual tasks being performed.
When the Execute Configuration scripts window appears, follow the steps listed in the window.
Run the scripts shown in the Execute Configuration scripts window
The first script is /u01/app/oraInventory/orainstRoot.sh
Next step is to configure the FRA disk group. In a terminal window, logged in as oracle, perform the following steps:
Use the oraenv utility to set the environment for the terminal session.
Enter +ASM when prompted for the ORACLE_SID
Start the ASM Configuration Assistant by entering asmca at the command line.
The ASM Configuration Assistant opens up displaying the current disk groups for the +ASM instance. Click on Create.
Enter FRA for the Disk Group Name. Select External (None) for redundancy. Select disk groups ASMDISK03 and click OK.
Disk Group Creation is in Progress.
Click OK in the DiskGroup: Creation window when it appears.
Notice that now there are two disk groups (DATA and FRA) listed for the ASM instance. Click Exit. Click Yes when asked if you really want to quit this application.
Close any open terminal windows.
Oracle Database 11g Release 2 Installation on Oracle Linux 6
Start the Oracle Universal Installer (OUI) by running the script runInstaller in the database directory as oracle user.
$
$ ./runInstaller
Oracle Universal Installer starts up
The Configure Security Updates page is the first to appear. In your real-world environment, you would enter your email address and My Oracle Support password. However, because the classroom is an isolated environment, please leave the email and password fields blank. Deselect the option to receive security updates from My Oracle Support and click Next.
Click Yes in the Email Address Not Specified warning message that appears.
Select Skip Software Updates. Next
Select the Install database software only option and click Next.
Select Single instance database installation and click Next.
Select all the languages and click Next.
Select the Enterprise Edition (4.7GB) and click Next.
In the Specify Installation Location page ensure that the value for Oracle Base is /u01/app/oracle.
For Software Location, enter /u01/app/oracle/product/11.2.0.3/db_1. This is the location where the Oracle database software will be installed. Click Next.
Select dba for both the OSDBA and OSOPER groups on the Privileged Operating System Groups page and click Next.
In the Perform Prerequisite Checks page, the OUI checks to make sure that your environment meets the minimum requirements for this installation.
In many cases if a prerequisite check fails, the OUI can generate a fixup script to fix the problem. For our Installation, all prerequisites have been met so no issues are found and the OUI automatically advances to the next page.
In the Summary page, review the settings and information, and click Install.
The Install Product page appears, showing you the progress of the installation and the status for each individual task being performed.
When the Execute Configuration scripts window appears, follow the steps listed in the window.
Open a terminal window and log in as root. Run the script shown in the Execute Configuration scripts window. Accept the default for the local bin directory and do not overwrite any files (you can just press [Enter] because the default option is to not overwrite).
Click OK on the Execute Configuration scripts window.
Click Close on the Finish page to complete the installation of the Oracle Database 11g software.
Oracle Database Creation
Open a new terminal Window and make sure the Listener and the ASM instance is up and running using the below commands.
lsnrctl status
ps –ef|grep pmon
Start the Database Configuration Assistant using the command dbca
DBCA Opens up.
Click Next
Click Create a Database. Next
Select General Purpose or Transaction Processing
Specify the Global Database Name and SID as orcl
Make sure Configure Enterprise Manager is checked.
Check Enable automatic Maintenance tasks. Click Next
Select Use the Same Administrative Password for All Accounts. Provide oracle_4U as the password.
Select Automatic Storage Management(ASM) as the Storage Type. Then click on Browse to select Database Area
Select DATA as the Disk Group for Database. Click OK.
Click Next.
Provide the ASMSNMP Password which we specified during the Grid Installation.
Here it is oracle_4U. Click OK
Specify the Fast Recovery Area. Click on Browse to choose the Disk Group for the Fast Recovery Area. Specify the FRA Size here
Select FRA from the available Disk Groups. Click OK and click Next
Make sure to check Sample Schemas if you want to create the Sample Schema in the database during the database creation. Click Next
Specify the Memory Size Here. You can enable AMM or ASMM here. Click on Sizing
Specify the Character Sets Here.Choose the Default option. Click on Connection Mode.
Select the type of Connection. Choose the Dedicated Server Mode. Click Next
You can Change the Database Storage here like datafile, redo log file, controlfile name and location. Click Next.
Make sure Create Database is selected. Click on Finish
The Create Database Summary is shown. Confirm it and click OK.
This will start the database Creation.
Once the Database creation Completed Successfully, the summary is displayed. Click on Exit
Login to the database using the command
sqlplus / as sysdba
Check the database name and open_mode using the SQL Command
Select name,open_mode from v$database;
Starting and Stopping ASM and Database.
Steps to start ASM, Database and EM.
1. Start ASM
srvctl start asm -o mount
2. Start Database
srvctl start database -d orcl
3. Start dbconsole
set the environment for database using the command oraenv and give the database name as orcl. then start the dbconsole using the below command.
emctl start dbconsole
Copy and Paste the URL for accessing the Enterprise Manager on to any browser.
Give the username as sys and password as oracle_4U. Connect as SYSDBA. Click on Login.
You will be logged in to the homepage of EM
Steps for Shutting Down the Database.
1. Set the environment for database and Shutdown the Database Control using the below command.
emctl stop dbconsole
2. Set the environment for ASM and Shutdown the Database and ASM instance using the below command.
srvctl stop database -d orcl -o immediate
srvctl stop asm -f
srvctl stop listener -f
Login to Database
. oraenv ---> orcl
sqlplus "/ as sysdba"
Login to ASM Instance
. oraenv ---> +ASM
sqlplus / AS SYSASM
Login to asmcmd
. oraenv ---> +ASM
asmcmd
Enterprise Manager Database Control URL - (orcl) :
https://ol6.localdomain:1158/em/
No comments:
Post a Comment