Introduction
This article describes the installation of Oracle Linux (Oracle Linux 6.5 64-bit) on Virtual Box (4.3.16). you can download the recent version of Oracle Virtual Box from Here.
The Linux software can be downloaded from the Oracle e-delivery site using your Oracle username and Password.
I will use this Virtual Machine for installing the Grid Infrastructure and 11g Database(Oracle 11.2 64-bit).
Virtual Machine setup
40 GB Hard Disk for Linux and Database
The Linux software can be downloaded from the Oracle e-delivery site using your Oracle username and Password.
I will use this Virtual Machine for installing the Grid Infrastructure and 11g Database(Oracle 11.2 64-bit).
Virtual Machine setup
40 GB Hard Disk for Linux and Database
Set
the base memory to at least 5 GB
Set
the hostname to ol6.localdomain
3 Hard Disk of 7 GB each for ASM
3 Hard Disk of 7 GB each for ASM
Mount Point Space Distribution
/
- 15 GB
Swap
– 5 GB
/u01
– 20 GB
Space
required for grid Installation – 5.5 GB
Space
Required for Database Installation – 4.7 GB
Virtual Machine Setup
1. Create new Linux Virtual Machine. Click on New.

2. Give the name, Type and version of the
virtual Machine. Choose Linux as Type and Oracle (64 bit) as version from the
drop down menu.

3. Select the memory size as 5 GB.

4. Create Hard Drive by selecting Create a Virtual Hard Drive now.
Click Create.
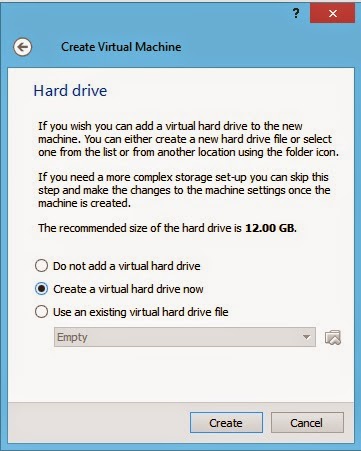
5. Select Hard drive file type as VDI.

6. Select Fixed Size option for Storage on physical hard drive

7. Select the file location and size for the Hard disk. Set the
size as 40 GB.

8. Virtual Hard Drive Creation is in Progress.

9. Now the Virtual Machine is created. You can see the memory
allocated and the Hard Disk created.

10. Click on General and then the Advanced tab set the Shared
Clipboard and Drag’n Drop to Bidirectional.

11.Select the Storage tab on right. and choose the Linux Installation Media. Choose
the IDE Controller and Choose a Virtual CD/DVD Disk file on the right.

12. Select the iso file

13. Once selected it will show up below the IDE Controller

14. Choose the network tab. Check Enable network adapter. Makesure
it is attached to Bridged Adapter. Select the Host network adapter from the
Name column

15. Now we are all set for Linux Installation.

16. Click on Start.

17. Select Install or upgrade an existing System.

18. Skip the media testing.

19. Click Next

20. Select English Language. Next.

21. Select U.S.English Keyboard. Next.

22. Choose Basic Storage Devices. Next

23. Choose - Yes Discard any data. Next

24. Give a name for the Computer. I named it ol6.localdomain. Next

25. Choose the time Zone. Next

26. Give root password. Next

27. Choose use all space. Check Review and modify Partitioning Layout.
Next.

28. Edit Partitioning Layout. Select the Volume Group and Click on Edit.

29. Select the root mount point(/) and Click on Edit.

30. Here we can allocate 15 GB to root(/) Mount Point. Enter the size of Mount point in MB. Give 15360 as the size and click ok.

31. Select swap click Edit.

32. We can give 5 GB for swap. Enter 5120 MB as the size. Click ok.

33. We will create one more mount point(/u01) which can be used for Oracle software installation. Click on Add.

34. Enter the mount point as /u01. Allocate the remaining space here.

35. Click on ok.

36. Click Next.

37. Click Format.

38. Click Write changes to Disk.

39. Click Next.

40. Choose Database Server. Make sure Oracle Linux Server is checked in additional Repositories. Select Customize now. Next.

41. In the left-hand column, select a package category to display the associated package groups in the
right-hand column.
Customize the server as per the below list.

42. Starting Installation.

43. Installation In Progress.

44. Reboot the machine after the Installation completed successfully.

45. Click Forward.

46. Accept the agreement.
Forward.

47. Select No. Click on
Forward.

48. Click on No thanks.
Click Forward.

49. Click Forward.

50. Create a user.
You can create oracle user here. Click Forward.

51. Set date ad time.

52. Click on Finish.

53. The login Screen will
be displayed. Click on Other.

54. Give the user name
root.

55. Provide the password
for root.

56. Check Do not show me
this again and close.

57. The desktop will be
displayed.

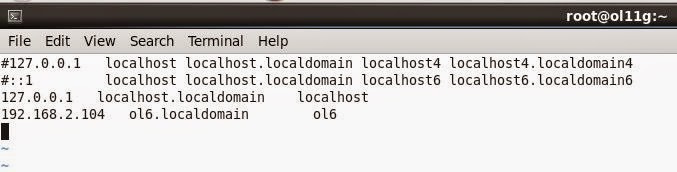
58. Next configure the network. Update /etc/hosts file with the details below. Comment out the existing entries and save
127.0.0.1 localhost.localdomain localhost
192.168.2.104 ol6.localdomain ol6
59.Click on System>Preference>Network
127.0.0.1 localhost.localdomain localhost
192.168.2.104 ol6.localdomain ol6
59.Click on System>Preference>Network
Connections.

60.Select System eth0 and click on Edit.

61.Check both Connect automatically and Available to all users. Select the IPV4 Settings. Select Manual from the Method drop down menu. Add the details as below.
Address 192.168.2.104
Netmask 255.255.255.0
Gateway 192.168.2.1
Click on Apply.

62.Add one more connection. Click on Add and click on create.

63.Check both Connect automatically and Available to all users. Select the IPV4 Settings. Leave the Method as Automatic. Click on Apply.

64.Now you can see two Network connections are created. Click on Close.

65.From the Network Icon on the top right corner you can make each connections active as per the requirement. If you want to connect to Internet you can select Wired Connection 1 and during database operations you can select System eth0.

66.Now select Wired Connection 1 by clicking on it. Now open the firefox browser and check if you are able to connect to the Internet.

67. Next we need to Install the Guest Addition. The Guest addition is required for proper mouse control, add shared folders and to copy text and files in and out of the Virtual Box.
Click on Devices on top of the virtual Machine. Click on Install Guest Additions CD image.

68. An autorun Prompt will show up in the terminal. Make sure you have selected Wired Connection 1. Click on OK.

69.Click on Run

70. Virtual box Guest Addition Installation is in Progress.
Press enter once Done.

71. Now restart the Machine. Click on System>Restart

No comments:
Post a Comment